System Version
-
Status
BASIC
Last Update
5/14/2025
ThreadX RV-STAR Test Report
Test Environment
Operating System Information
- Source Code Link: https://github.com/Nuclei-Software/nuclei-sdk
- Reference Installation Document: https://doc.nucleisys.com/nuclei_sdk/design/board/gd32vf103v_rvstar.html
- Download Links:
Hardware Information
- RV-STAR Development Board (GD32VF103VBT6)
- A USB to UART Debugger
- JTAG Debugger
- A Type-C Cable
Installation Steps
Setting Up the Environment
Download and extract the toolchain and OpenOCD, then set up the toolchain directory:
wget https://download.nucleisys.com/upload/files/toolchain/gcc/nuclei_riscv_newlibc_prebuilt_linux64_nuclei-2024.tar.bz2
tar -xzvf nuclei_riscv_newlibc_prebuilt_linux64_nuclei-2024.tar.bz2
wget https://download.nucleisys.com/upload/files/toolchain/openocd/nuclei-openocd-2024.02.28-linux-x64.tgz
tar -xzvf nuclei-openocd-2024.02.28-linux-x64.tgz
export NUCLEI_TOOL_ROOT=$(pwd)
Download the SDK:
git clone https://github.com/Nuclei-Software/nuclei-sdk.git
cd nuclei-sdk
cat << EOF > setup_config.sh
NUCLEI_TOOL_ROOT=$(echo $NUCLEI_TOOL_ROOT)
EOF
source setup.sh
Connect to the Board
Consult the following diagram for the pins to connect to your JTAG debugger:
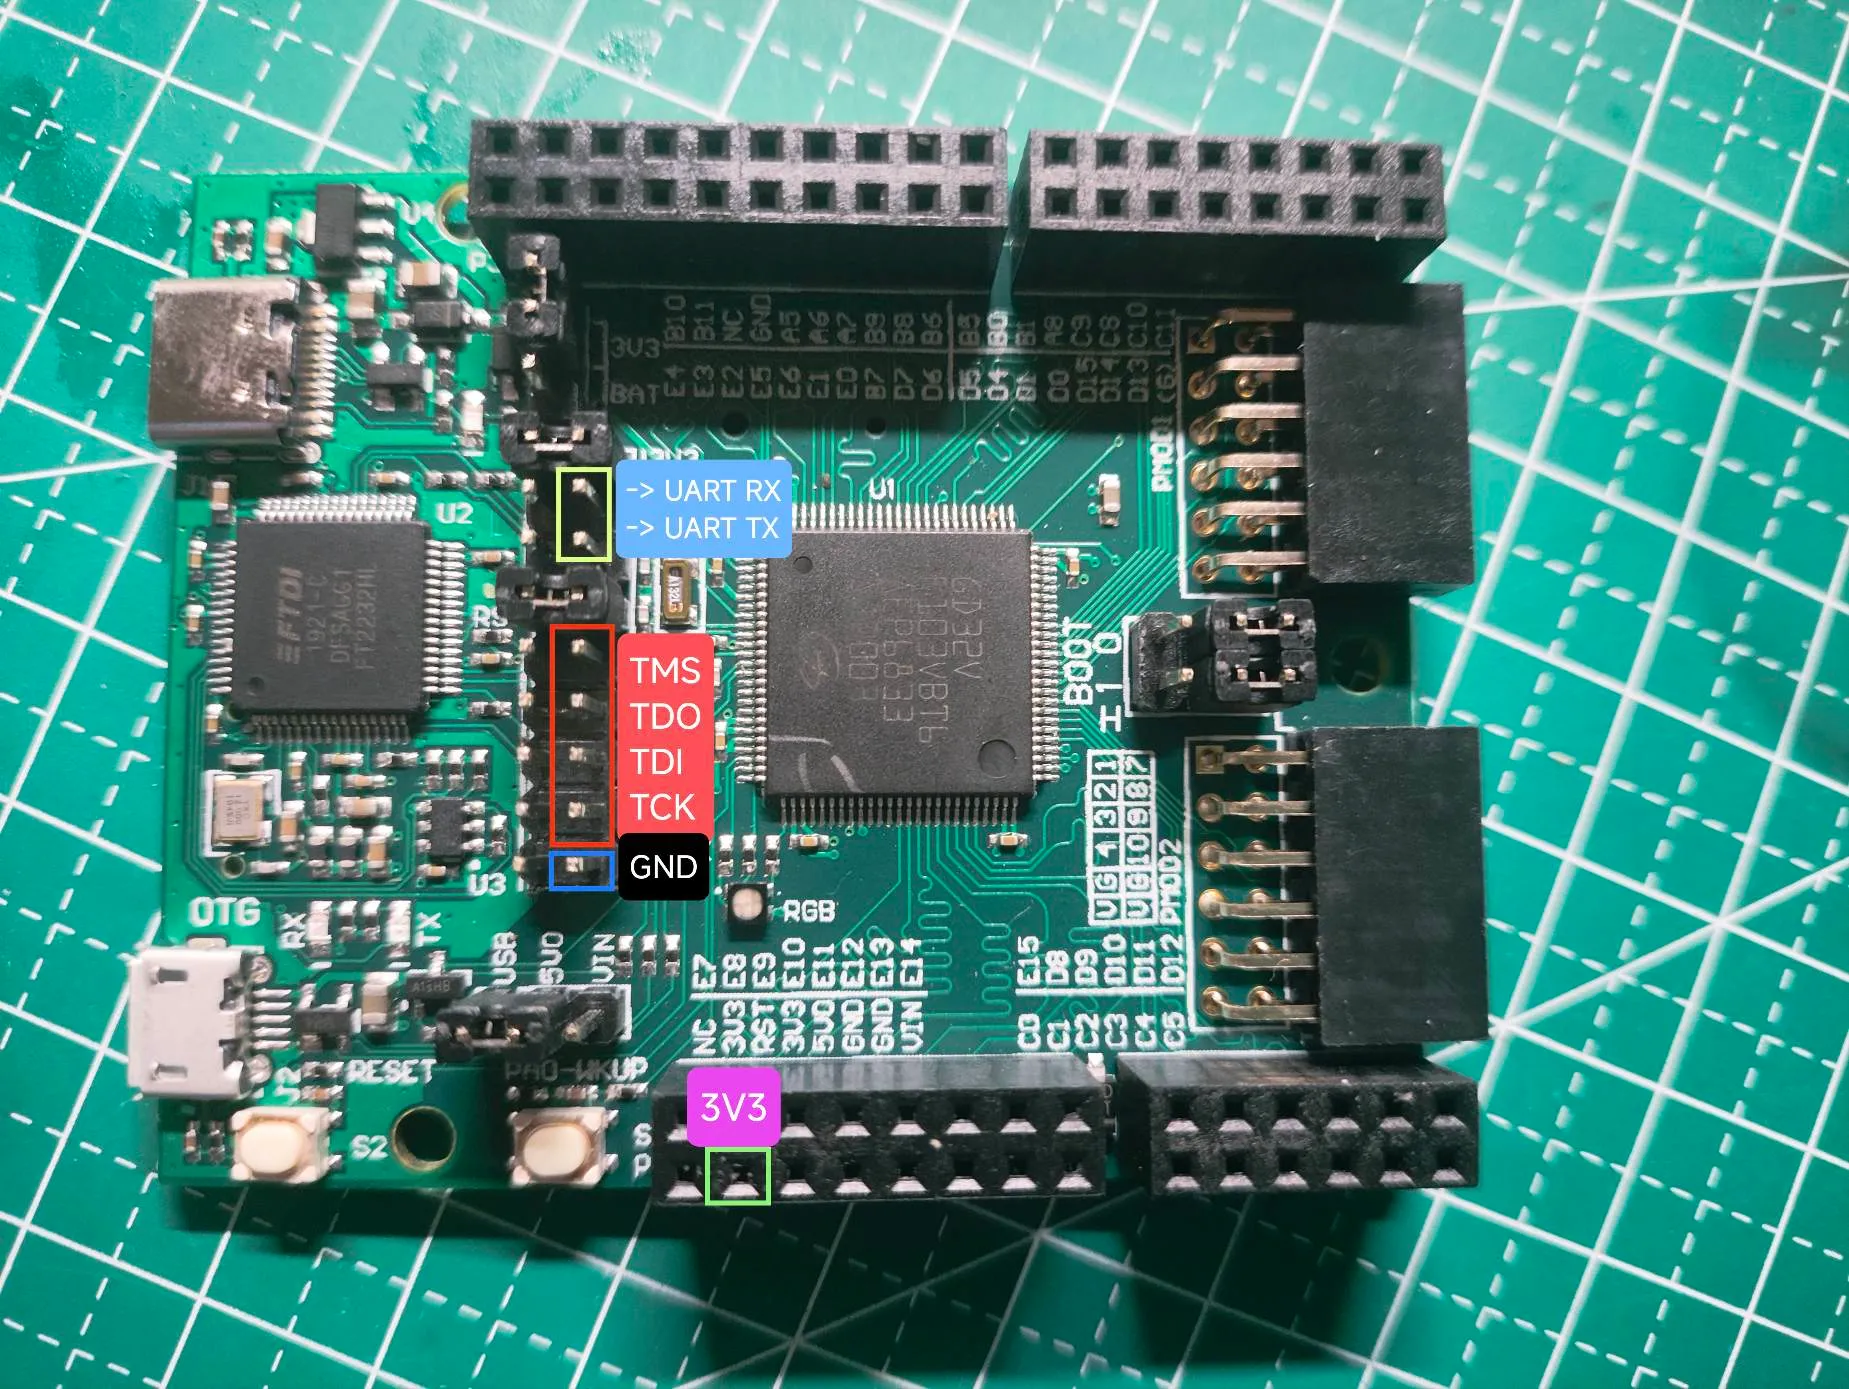
Note that power supply is required through both the 3V3 pin and the Type-C port.
Compiling the Code
Compile ThreadX:
cd application/threadx/demo/
make SOC=gd32vf103 BOARD=gd32vf103v_rvstar clean
make SOC=gd32vf103 BOARD=gd32vf103v_rvstar all
Flash Image
Make sure your debugger and OpenOCD binary is supported by the build system.
For the former, consider editing relevant settings in ../../../SoC/gd32vf103/Board/gd32vf103v_rvstar/openocd_gd32vf103.cfg to match your JTAG debugger.
e.g. with Sipeed SLogic Combo 8 debugger at DAP-Link mode:
diff --git a/SoC/gd32vf103/Board/gd32vf103v_rvstar/openocd_gd32vf103.cfg b/SoC/gd32vf103/Board/gd32vf103v_rvstar/openocd_gd32vf103.cfg
index 019218da..66895b18 100644
--- a/SoC/gd32vf103/Board/gd32vf103v_rvstar/openocd_gd32vf103.cfg
+++ b/SoC/gd32vf103/Board/gd32vf103v_rvstar/openocd_gd32vf103.cfg
@@ -2,8 +2,8 @@ adapter speed     5000
 reset_config    srst_only
 adapter srst pulse_width 100

-adapter driver ftdi
-ftdi vid_pid 0x0403 0x6010
+adapter driver cmsis-dap
+cmsis-dap vid_pid 0xd6e7 0x3507

 ## bindto 0.0.0.0 can be used to cover all available interfaces.
 ## Uncomment bindto line to enable remote machine debug
@@ -25,14 +25,14 @@ if { [ info exists JTAGSN ] } {
     adapter serial $JTAGSN
 }

-ftdi layout_init 0x0008 0x001b
-ftdi layout_signal nSRST -oe 0x0020 -data 0x0020
+#ftdi layout_init 0x0008 0x001b
+#ftdi layout_signal nSRST -oe 0x0020 -data 0x0020
 # These signals are used for cJTAG escape sequence on initialization only
-ftdi layout_signal TCK -data 0x0001
-ftdi layout_signal TDI -data 0x0002
-ftdi layout_signal TDO -input 0x0004
-ftdi layout_signal TMS -data 0x0008
-ftdi layout_signal JTAG_SEL -data 0x0100 -oe 0x0100
+#ftdi layout_signal TCK -data 0x0001
+#ftdi layout_signal TDI -data 0x0002
+#ftdi layout_signal TDO -input 0x0004
+#ftdi layout_signal TMS -data 0x0008
+#ftdi layout_signal JTAG_SEL -data 0x0100 -oe 0x0100
 transport select jtag

 set _CHIPNAME riscv
Also consider adding an udev rule if necessary (refer to https://github.com/arduino/OpenOCD/blob/master/contrib/60-openocd.rules) For the latter, make sure your OpenOCD version is up to date with support for your debugger; a known usable version is at https://github.com/xpack-dev-tools/openocd-xpack/releases/tag/v0.12.0-4
When all set, flash the binary with:
make SOC=gd32vf103 BOARD=gd32vf103v_rvstar uploadStarting the System
Connect to the development board via the serial port.
Expected Results
The system should start normally, and information should be viewable through the onboard serial port.
Actual Results
The system booted normally, with information available through the onboard serial port.
Boot Log
Nuclei SDK Build Time: May 13 2025, 23:44:33
Download Mode: FLASHXIP
CPU Frequency 108000000 Hz
thread 6_7 is running, current is 6, thread 6 counter 1, thread 7 counter 1
thread 6_7 is running, current is 7, thread 6 counter 2, thread 7 counter 1
thread 6_7 is running, current is 6, thread 6 counter 2, thread 7 counter 2
thread 6_7 is running, current is 7, thread 6 counter 3, thread 7 counter 2
thread 6_7 is running, current is 6, thread 6 counter 3, thread 7 counter 3
thread 6_7 is running, current is 7, thread 6 counter 4, thread 7 counter 3
thread 6_7 is running, current is 6, thread 6 counter 4, thread 7 counter 4
thread 6_7 is running, current is 7, thread 6 counter 5, thread 7 counter 4
thread 6_7 is running, current is 6, thread 6 counter 5, thread 7 counter 5
thread 6_7 is running, current is 7, thread 6 counter 6, thread 7 counter 5
thread 6_7 is running, current is 6, thread 6 counter 6, thread 7 counter 6
thread 6_7 is running, current is 7, thread 6 counter 7, thread 7 counter 6
thread 6_7 is running, current is 6, thread 6 counter 7, thread 7 counter 7
thread 6_7 is running, current is 7, thread 6 counter 8, thread 7 counter 7
thread 6_7 is running, current is 6, thread 6 counter 8, thread 7 counter 8
thread 6_7 is running, current is 7, thread 6 counter 9, thread 7 counter 8
thread 6_7 is running, current is 6, thread 6 counter 9, thread 7 counter 9
thread 6_7 is running, current is 7, thread 6 counter 10, thread 7 counter 9
thread 6_7 is running, current is 6, thread 6 counter 10, thread 7 counter 10
thread 6_7 is running, current is 7, thread 6 counter 11, thread 7 counter 10
thread 6_7 is running, current is 6, thread 6 counter 11, thread 7 counter 11
thread 6_7 is running, current is 7, thread 6 counter 12, thread 7 counter 11
thread 6_7 is running, current is 6, thread 6 counter 12, thread 7 counter 12
thread 6_7 is running, current is 7, thread 6 counter 13, thread 7 counter 12
thread 6_7 is running, current is 6, thread 6 counter 13, thread 7 counter 13
thread 6_7 is running, current is 7, thread 6 counter 14, thread 7 counter 13
thread 6_7 is running, current is 6, thread 6 counter 14, thread 7 counter 14
...
(truncated)
Test Criteria
Successful: The actual result matches the expected result.
Failed: The actual result does not match the expected result.
Test Conclusion
Test successful.
Source: Support Matrix