System Version
-
Status
BASIC
Last Update
5/13/2025
Arch Linux Pine64 Ox64 Test Report
Test Environment
Operating System Information
- BuildRoot
- Download Link: https://github.com/domhathair/pine64_ox64_archlinux/releases/download/v2024.06.1/sdcard.tar.gz
- Reference Installation Document: https://github.com/domhathair/pine64_ox64_archlinux
Hardware Information
- Pine64 Ox64
- A Type-C or microUSB cable
- A UART debugger (CH340G preferred, avoid CP2102)
- A microSD card
- A microSD card reader
Installation Steps
Get the Image
Download and extract the precompiled image and firmware:
wget https://github.com/openbouffalo/buildroot_bouffalo/releases/download/v1.0.1/bl808-linux-pine64_ox64_full_defconfig.tar.gz
tar -xvf bl808-linux-pine64_ox64_full_defconfig.tar.gz
cd bl808-linux-pine64_ox64_full_defconfig/firmware
xz -d sdcard-pine64_ox64_full_defconfig.img.xz
Flashing the Firmware via UART
Power on the board through either the microUSB or Type-C port while holding down the BOOT button. Connect GPIO ports 14 and 15 to your debugger’s RX and TX, respectively - This is the “Flashing UART”.
Download the flashing tool and use the appropriate version for your system to flash the firmware. Make sure your BLDevCube binary is of version 1.8.3 or lower.
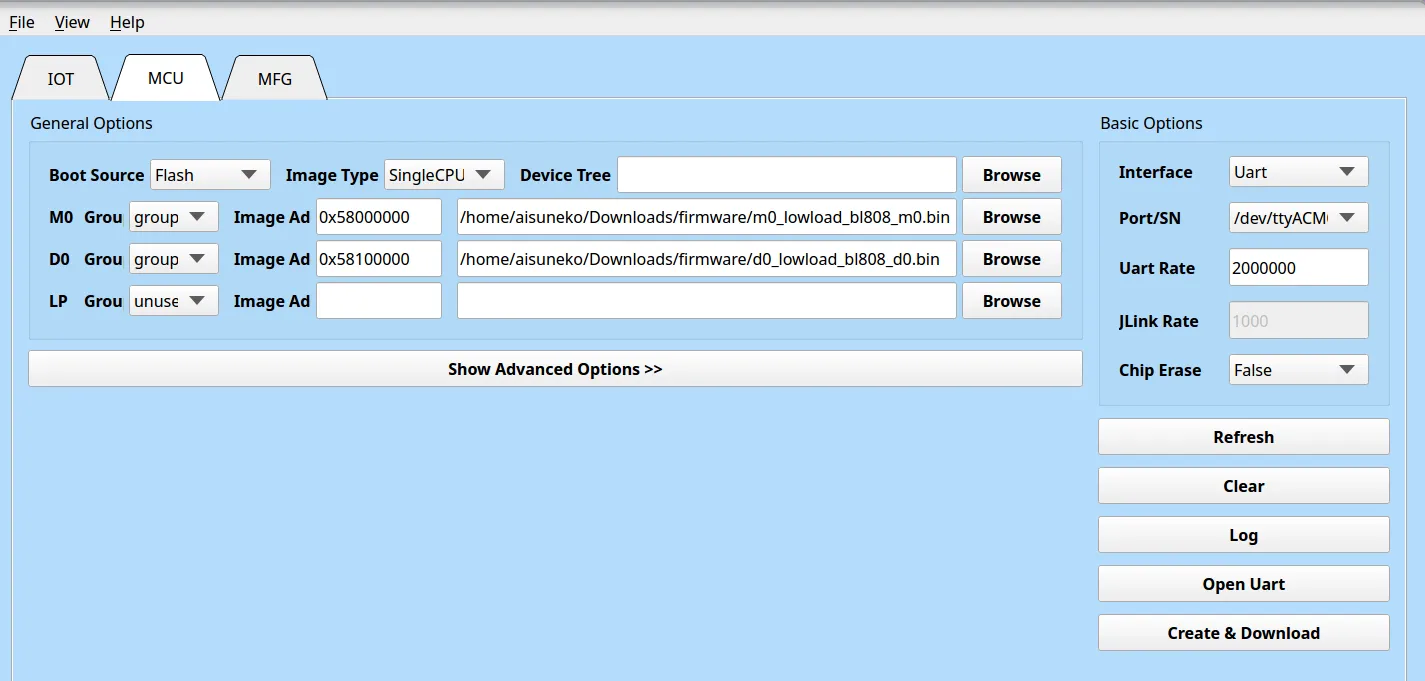
Enter the MCU tab and set the parameters as shown below:
M0: Group: group0, Image Addr: 0x58000000, and choose m0_lowload_bl808_m0.bin from the above archive
D0: Group: group0, Image Addr: 0x58100000, and choose d0_lowload_bl808_d0.bin from the above archive
Choose your UART port correspondingly and set the “Uart Rate” to 2000000.
Click “Create & Download” and wait for it to complete.
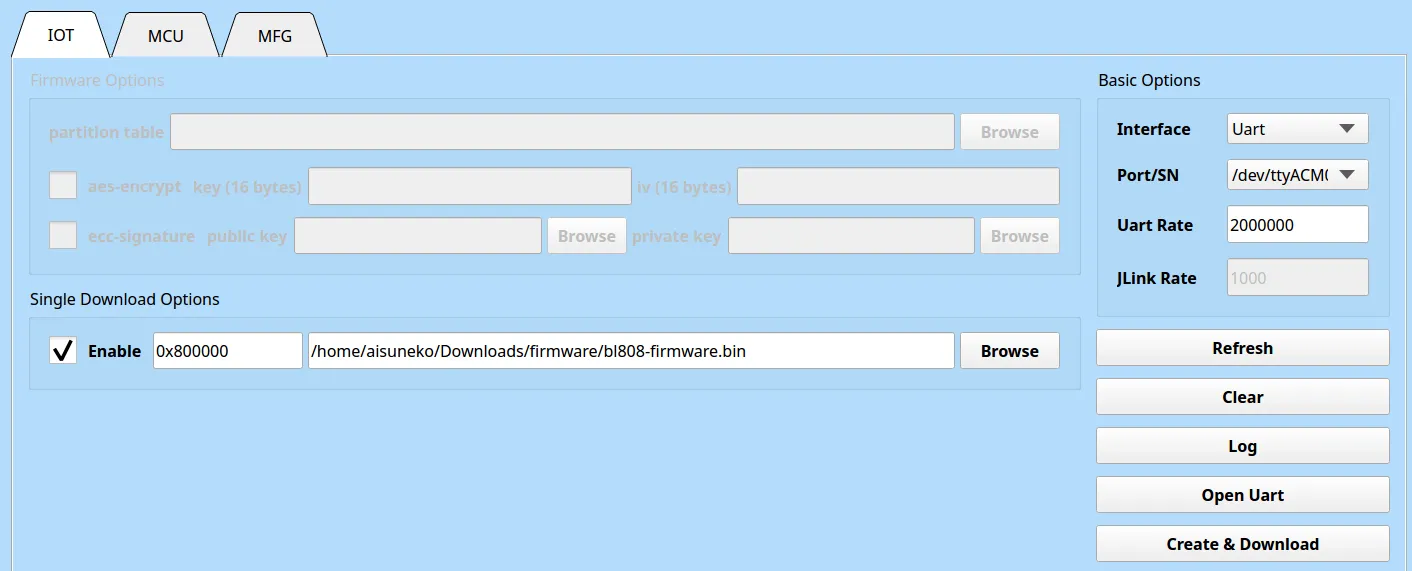
Next, Enter the IOT tab and set the parameters as shown below:
Enable “Single Download”, set address to 0x800000 and choose bl808-firmware.bin from the above archive.
Click “Create & Download” and wait for it to complete.
Flash the image to SD card
wget https://github.com/domhathair/pine64_ox64_archlinux/releases/download/v2024.06.1/sdcard.tar.gz
tar -xvf sdcard.tar.gz
dd if=sdcard.img of=/dev/your/device status=progress
Boot
Insert the SD card, and connect GPIO ports 32 and 31 to your debugger’s RX and TX, respectively - This is the “Serial Console UART”. Remember to set the baud rate to 2000000.
Default Username: root
Default Password: archriscv
Expected Results
The system should start normally with serial output.
Actual Results
The system started successfully, with serial output.
Boot Information
Arch Linux 6.5.11 (hvc0)

buildroot login:
Arch Linux 6.5.11 (ttyS0)

buildroot login: root
Password:
[root@buildroot ~]# uname -a
Linux buildroot 6.5.11 #1 Fri Jun 28 00:07:35 MSK 2024 riscv64 GNU/Linux
[root@buildroot ~]# cat /etc/os-release
NAME="Arch Linux"
PRETTY_NAME="Arch Linux"
ID=arch
BUILD_ID=rolling
ANSI_COLOR="38;2;23;147;209"
HOME_URL="https://archlinux.org/"
DOCUMENTATION_URL="https://wiki.archlinux.org/"
SUPPORT_URL="https://bbs.archlinux.org/"
BUG_REPORT_URL="https://gitlab.archlinux.org/groups/archlinux/-/issues"
PRIVACY_POLICY_URL="https://terms.archlinux.org/docs/privacy-policy/"
LOGO=archlinux-logo
[root@buildroot ~]# lscpu
Architecture:           riscv64
  Byte Order:           Little Endian
CPU(s):                 1
  On-line CPU(s) list:  0
Vendor ID:              0x5b7
  Model name:           -
    CPU family:         0x0
    Model:              0x0
    Thread(s) per core: 1
    Core(s) per socket: 1
    Socket(s):          1
[root@buildroot ~]#
Test Criteria
Successful: The actual result matches the expected result.
Failed: The actual result does not match the expected result.
Test Conclusion
Test successful.
Source: Support Matrix